:jbake-title: _The title of the post_
:jbake-author: _Author of the post_
:jbake-date: _date of the post in the format yyyy-mm-dd (e.g. 2024-05-03)_
:jbake-type: post
:jbake-tags: _comma separated tags_
:jbake-status: published
:jbake-menu: Blog
:jbake-order: _Order number for the post; the ordering is ascending_
:keywords: {jbake-tags}
ifndef::imagesdir[:imagesdir: ../assets/images]

ifndef::optimize-content[]
:toc:
endif::optimize-content[]

== {jbake-title}
ifndef::optimize-content[]
{jbake-author}
{jbake-date}

Keywords: {keywords}

---
endif::optimize-content[]
Blog
About this Blog
This section contains several post around the context of documentation.
This Blog is written with asciidoc and the target formats (a static web site, Confluence Pages, simple HTML, …) are generated with the docToolchain.
In order to get the structure generated as it is, you need to follow some rules
-
Images to include should be stored within the
asset/imagesfolder -
For each year there is a folder where you can put your posts for the corresponding year
-
To get the years ordered descending, ever
index.adocof a year includes thejbake-orderattribute counts down from 99 (year 2023 got 99, year 2024 got 98, and so on) -
Every post file must start with the prefix
BLOG_ -
Every post must start with the following header:
Header of one PostYou can copy the .template.adoc to the corresponding year and start posting.
One word of why one blog post file must start with the prefix BLOG_
We like to generate this blog section to all formats, not only to the static website. So, we even want to publish this section to Confluence.
At least for having simpler configuration possibilities for the docToolchain task publishToConfluence, it’s easier to have one adoc file which includes the corresponding ones.
Of course, it’s not convenient to change the index.adoc file whenever you need to include a new blog post to the site.
Luckily docToolchain provides a task called collectIncludes which crawls over your directory structure for files with the name matching to the pattern ^[A-Za-Z]{3,4}[_].* (like for BLOG_xxxx.adoc or ADR_xxxx.adoc) and creates one …includes.adoc file within the build/_includes folder. This file can then be included wherever you want to include the matching files. For detailed infos, check the documentation of the task. In short: we use this technique within our CI pipeline in order to generate the needed targets by adding
ifndef::optimize-content[]
include::{targetDir}/_includes/BLOG_includes.adoc[]
endif::optimize-content[]
into the index.adoc file of this section.
1. Publish your docs to Confluence with the docToolchain
Dieter Baier 2024-05-03
Keywords: blog, asciidoc, confluence
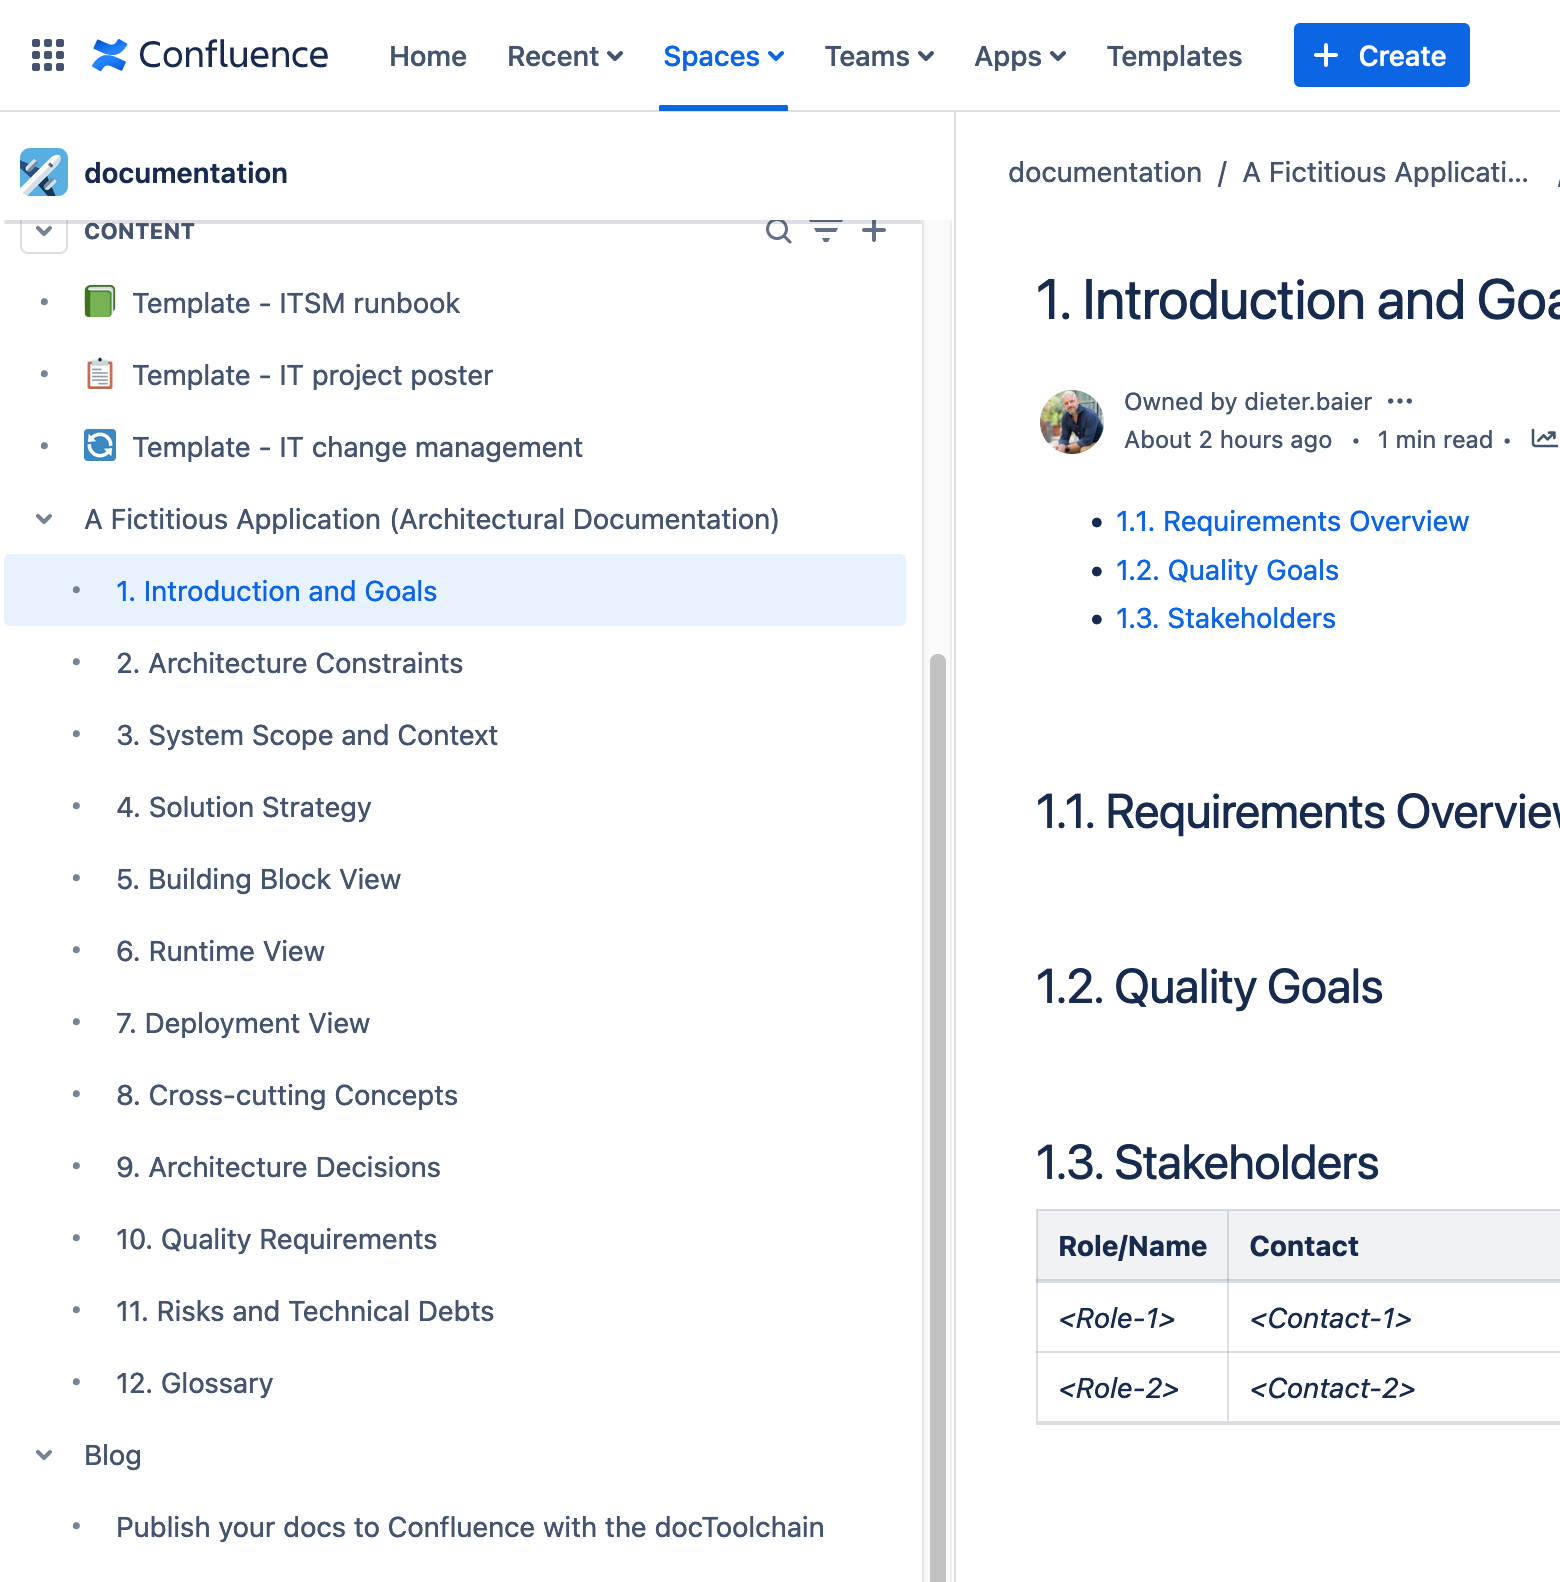
Figure 1. Screenshot of one Confluence Site with the documents of this project published by the docToolchain. NOTE: On the screenshot, you can see to topics published, the Architectural Documentation and the Blog. Both are written as asciidoc-Files and published to Confluence automatically by the CI-Pipeline.
1.1. Use of the docToolchain task
./dtcw publishToConfluence -PconfluenceUser=<User> -PconfleuncePass=<API-Token> (1)-
Check Manage API tokens for your Atlassian account for how to generate your Confluence API token.
This will generate the HTML representation of the documentation and publish it to a Confluence space configured within the docToolchainConfig.groovy (Look for the section confluence.with to review the settings).
Check the publishToConfluence docToolchain task documentation for further detailed information.
As an example, you can check The documentation sandbox on Dieter Baier’s Confluence Sandbox.
1.2. Structure your code
With the docToolchain task, you can publish several documents to confluence. But it only publishes documents, which are configured to be published (see section below).
In case, you got several documents to publish, all belonging to on topic (e.g. the arc42 template consists of separate files for each chapter), you probably won’t like to configure each chapter for being published (especially, when you like to publish some content, where there could be added additional files very dynamically, like a Blog for example) to Confluence.
Instead, you’d rather like to configure one file (we call it index.adoc), which includes all files, belonging to this topic. This is the way, how the arc42 template is structured.
In this case, you’d only define one file within the configuration to be published and all included files will automatically be published as well.
But be aware: If you follow this strategy, you basically generate one document with several chapters. You can check the .html-output to get a better feeling. The docToolchain task, however, splits each chapter to one Confluence page below the main page of the topic.
This means: You MUST have a Level 1 header within your index.adoc and every chapter which needs to be included within this topic MUST start with a Level 2 header.
Example
index.adoc (the main page for the topic)# Topic header
Text describing the topic
include::chapter.adoc[]chapter.adoc (one chapter of the topic)## Header of the chapter
Text describing the chapterNow, when some asciidoc renderer renders the index.adoc file, the result would be like:
Result of rendering the index.adoc
# Topic header
Text describing the topic
## Header of the chapter

Text describing the chapterAnd this result would converted to one .html-File.
Finally - as you remember - the docToolchain task takes the result and publishes each chapter as one Confluence page, but structured based on the header level.
|
Note
|
Structuring your documents in this way does not break the site generation, since that task treats ever file as own document and structures the documents differently. |
1.3. Configure the docToolchain
Basically you need to tell the docToolchain task the following information to get your pages successfully published to Confluence
Within the docToolchainConfig.groovy file search for confluence.with. Below this tag, you need following attributes to answer these questions:
| Needed info | Attribute within the configuration |
|---|---|
Which page needs to be published? |
|
To which Confluence? |
|
To which Space within that Confluence? |
|
The credentials |
Dont put the credentials to the configuration; instead supply them as in the initial example |
Check the docToolchain Configuration of this site to get a feeling.
1.4. Some things, you need to know when you publish to Confluence
-
The actual content in Confluence will be overwritten after a new publishing
-
Nevertheless, the history of the page is kept. So, at least you can track changes even in Confluence and users not using Git could somehow participate with the documentation - even-though this is not really recommended
-
Comments on the page will not get lost. So, collaborating is possible
-
Labels you set at confluence will not be removed when there was a new publish done; instead the task will add those keywords defined on a page as Confluence labels
2. Wipe your content from Confluence
|
Warning
|
Wiping your content from Confluence with the docToolchain-Task means, that you’ll remove all the contents from the given space. Even this content provided outside your docToolchain |
./dtcw publishToConfluence -PconfluenceUser=<User> -PconfleuncePass=<API-Token>Feedback
Was this page helpful?
Glad to hear it! Please tell us how we can improve.
Sorry to hear that. Please tell us how we can improve.